I hope the diary is useful and interesting for pilots who are also thinking about doing IR training. It is important to note that the diary is of course neither "complete" nor in any way "correct". I simply noted down what we did in each lesson and what I took away as key learnings.
It is important to note that I only ever flew Cessna 172s before my training. During my training I flew a TB20 with a variable pitch propeller and retractable undercarriage and TKS deicing. So it wasn't just instrument flying that was new to me, but also the handling of a complex machine. That's exactly what I wanted! That's why the diary also contains some very aircraft-specific tips (first in the simulator and then in the TB20). I have now added a few hints which I have always marked with "Note".
Have fun!
27 September - Fifth flight in the simulator with flight instructor 2
General findings
- Curved flight and artificial horizon:
We flew several holdings. Flight instructor 2 explained that the artificial horizon displays incorrect values over a longer period of time when flying a constant turn. The reason for this is that the plumb line is pulled downwards by the centrifugal forces in the turn. This is why the holding is not designed as a continuous curve. - IFR training area Wesel:
The training area includes waypoints such as Bottrop and LUSIX, which are stored in the Garmin system. Nevertheless, the flight instructor emphasised that the distances to these waypoints should be known by heart, such as BAM R328-R340 and DME 25-35. - Take-Off Briefing:
We used the standard formulation for the start: "Climbing with training climb configuration at 95 knots." - Standard Take-Off:
The take-off was carried out in the training configuration with 10 degree flaps. - Single pilot without autopilot:
Interesting note: Single-pilot operation without autopilot is officially recognised as "Emergency" categorised.
Procedure Turns
- Why procedure turns?
Procedure turns are used to reverse the course, for example to return to a target course or to cut a radial. Instructor 2 presented two standard procedures:- 80/260 processHere you fly 80 degrees in one direction, followed by 260 degrees in the opposite direction.
- 45/180 procedureAlternatively, you fly 45 degrees in one direction, followed by a 180-degree turn back to the target course.
- Flight instructor recommendation:
The 80/260 method has the disadvantage that it describes a larger circle and is therefore more susceptible to wind. This is why he prefers the 45/180 method, which is also recognisable. - Practical realisation:
- First you fly 45 degrees for 45 seconds in the specified direction.
- Then turn the heading bug 180 degrees and fly a standard turn on it.
- At the same time, the OBS is set to the opposite course.
- After completing the turn, you are 45 degrees away from the original route and can cut it cleanly.
- Corrections during the turn:
Instructor 2 gave the technique for minimal course corrections "Bank and Return" to the hand.
We then practised the whole thing several times. After that we practised several VOR and NDB holds and landing approaches.
Overflight of an NDB or VOR
There are special challenges when flying over an NDB or VOR - for example at a fly-over waypoint:
- Silence cone:
While you are in the silent cone, you already turn onto the target course. You then fly parallel to the target radial for one minute. - Cutting the radial:
In order to cut the radial cleanly, the course is then corrected by 30 degrees (depending on the course lay-off) and you fly exactly towards the radial.
Landing approach
- Set flaps and undercarriage:
- With a "Half Deflection" of the glide slope, the flaps are set to 10 degrees.
- As soon as the display "1 Dot High" is reached, the running gear is extended.
- Note on the instrument display:
The above statement is based on a 5-DOT display. However, as only a 2-DOT display is used in the simulator, the landing gear is extended as soon as the display is in the middle between the centre and the first point.
30/09 - Sixth flight in the simulator with flight instructor 2
General findings after the training session (airwork, steep turns, approaches, navigation)
- IFR training area and navigation:
The IFR training area was discussed again. There are two ways to orientate yourself here:- Via the display on the moving map.
- (Recommended) About the BAM radials and DME removals.
- The radial R334 is first set to NAV2 in order to remain centred in the zone.
- The RMI is set to VOR2, which has the advantage that the needle always points to the current radial.
- The DME display is used to ensure that you remain within the specified distance limits.
- Engine check during take-off:
It is advisable to check whether the engine is accelerating normally before take-off. However, the maximum speed is not reached until take-off. - Cancelling a start:
It is important to realise when a launch should be aborted if problems occur. - Climb with autopilot:
Many pilots set a vertical speed (VS), which leads to different speeds at different altitudes (and the danger of flying into a stall). A better method is to fly by pitch, at around 10 degrees. This value is adjusted depending on the weather conditions (e.g. 8 degrees in hot weather).- When setting the autopilot, the function "Role and Pitch" must be activated so that the pitch value is maintained.
- Formulas and maps:
Essential formulae should always be to hand. The Jeppesen charts themselves have NOTAMs (e.g. detected chart errors), which should be checked in advance.
Steep curves
- Technology for precise flying:
The artificial horizon is the central aid. When the course gyro indicates 15 degrees ahead of the target course, you should turn in. After that, only the artificial horizon is used to finish the turn.
OBS settings
- Flexibility with the OBS function:
The OBS function allows you to fly to any point from any angle. The following procedure was practised during training:- Leaving the aerodrome circuit after a lateral take-off.
- Then set course for BOT (Waypoint). If I enter the waypoint on the ground, it calculates the direct route from the airport reference point to it and thus creates the magenta line. But if I want to catch it, I have to fly the opposite approach ... so it doesn't fit for what I want to achieve
- Various methods:
- Direct To at the end of the lateral approach and readjust course.
- I use OBS and set 020 degrees on the HSI. Then I just see this inbound course to BOT starting from the end of the cross take-off. I then simply fly straight ahead on the transverse descent until the radial enters the HSI and then turn to 020.
- Note on the OBS function in flight:
OBS function freezes the next waypoint, you would follow the line to infinity and the flight plan does not continue -> you then have to switch off the OBS function in flight if you want the GPS to navigate to the next waypoint.
Approach: RNP Approach
- Terminology:
- It is called "RNP Approach" not GPS and also not LPV
- Practical realisation:
For example, if the pilot says: "Turn right heading 270 cleared RNP Runway 24"that means:- Approach the runway at 270 degrees.
- Turn to the final approach.
- RAIM Prediction:
About Utilities a RAIM forecast can be called up for any location and any time. If coverage is not available, the pilot must switch to an ILS approach.- Example phrase: "Unable RNP Approach, Request ILS Approach."
- Report to the tower:
After stabilising on the approach course, radar hands me over to the tower. I report:
"Dortmund Tower, DEISM established final approach track Runway 24 for touch and go." - Checklist and flap configuration:
At 1000 feet above ground (better to start at 1400 feet) the final checklist is run through and the landing configuration is set with full flaps. - EGNOS Channel ID:
When loading the RNAV approach, the EGNOS channel ID is checked and compared with the one on the map.
01.10. - Seventh flight in the simulator with flight instructor 2
Taxiing - thinking ahead and progressive support
Preparation is an essential part of the taxiing process. It is crucial to think in advance about exactly where you will land based on the length of the runway so that you can go through the route mentally. Should you nevertheless become unsure or get lost, the enquiry "Request progressive taxiing" a sensible option for ground clearance.
We then flew various departures and approaches in the simulator.
Start - planning and realisation
- Preparation:
- Switch on the batteryFirst activate COM1, listen to ATIS and determine which runway is the best choice based on distance and wind direction.
- The enquiry at Delivery (or Ground) is: "...Information Alpha request startup and clearance."
- Clearance takes place to the IFR destination or to a point at which the IFR plan ends (e.g. BOT).
- Navigation during take-off (take-off from Cologne):

- The flight took place over the route COLA 3F. At the beginning it was necessary to fly a course (not a radial). There were three options for this:
- Use of the IKEN localiser as an OBS stationary line (137 turned in) and flight to HSI.
- Navigation via GPS track and moving map.
- Flying with navigation systems: KBO is not a good choice here because VOR is next to the runway. It is better to take the IKEN localiser, which is located in the extension of the runway, select it on NAV 1 and turn OBS to 137
- NAV settings:
- We have turned in COL on NAV 2 and turned in inbound 096 on OBS. We also have COL on NAV 1 in standby because we switch over later as we always fly with NAV 1
- I have to listen to the localiser in NAV 2. In Nav 1 it fits if Garmin displays the identifier. For Nav1 and 2 I have to identify the DME in any case, i.e. listen to it
- Checklists:
- The checklist "Gyro slaved and checked": Switch to Slaved and pull, then check CW and CCW to see if the gyro rotates and the display matches the GPS.
- The checklist "Annunciator Panel"The button is located above the liquor compass. Various warnings must light up when pressed.
- Communication channels:
- COM1 is used for ATC (tower, radar, etc.).
- COM2 is used for ATIS, delivery and ground.
- I have three devices that I have to name correctly and call out at the briefing: "OBS CDI", "HSI", "RMI".
- Mistakes I made at the start:
- I made a mistake at the start. He said (we were starting from 14L) "Wind 100, 10 knots". I could have calculated: 40*10/95=4 degrees to the left. Second mistake: The HSI line moved to the right and I flew behind it (which makes no sense in this wind). Mistake was: What I used was the localiser backcourse!!! And it was set to the opposite course
Using the RMI - Precise navigation
- "Fly away from needles end" and "Follow the head" or "Pushing the head and pulling the tail" Push the Head and Pull Tail of a Bearing Pointer
- What I get on with better: if the currently displayed QDM is larger than where I want to go, then I have to steer larger. If it is smaller, then I have to steer smaller.
- Example: If I am flying TO a station, e.g. I am flying 360 and the needle is pointing to 360, but I want to fly to the station on course 030. My displayed course is therefore smaller than where I want to go:
- In this case, I fly a little to the left, e.g. to 330 and wait until the arrow reaches 030 and then turn on it...in the sense of pushing the head (I push the arrow over from the left position). Which is also good. I visualise in the sky that the target is at 360. If I now want the target to be in front on the right, I logically have to turn to the left
- If I want to fly away from a station on a certain course: Let's say I'm flying 360 and am currently on QDR 315. I want to fly away from the station on course 350. For example, I turn to 060 and then pull the tail to 350 (or I push the head to 170) and then turn to course 350 when it comes in
- Or imagine again: If I see the target at the back right in the example and I want to have it directly behind me, then I have to fly to the right
OBS CDI - Extended use
- OBS CDI: I have to mentally turn the OBS in the direction of the CDI. Let's assume I am flying heading 320, OBS on the CDI is set to 90 and indicates a right turn. Then I imagine that the aeroplane is flying in the direction of the CDI, i.e. 90 degrees, and understand that the station is at 120 degrees, for example.
- OBS CDI is more or less a further development of RMI. Be careful with CDI: The CDI display is only "meaningful" if you fly in the direction that is turned in on the OBS
06.10. - Eighth flight in the simulator with flight instructor 2
General information on navigation and approach preparation
- NDB approach with GPS overlay:
It is permitted to use a GPS overlay as a backup, even when officially flying to NDB. However, it is important that the flight is performed correctly according to NDB in order to fulfil the examination requirements. If the examiner finds that the aircraft is exactly on the centreline (which is unlikely with a pure NDB approach), this could be considered incorrect. - VOR alignment at start:
When taking off from Dortmund with the DOR-VOR set to NAV, it is normal for the VOR to be slightly to the right of the runway. - Check slave test:
The test checks whether the HSI and the RMI move correctly when the slaved switch (CW and CCW) is turned. After resetting to slave, the course should align itself according to the magnetic compass.
Special features of approach charts and briefings
- Descent rate (ft/min):
The sink rate depends on the groundspeed. It is important to take the wind into account in the calculation. - Briefing sample:
A structured briefing should first cover the radio frequencies (from the first column of the map). Other points are then dealt with. - Approaching Minimum" callout:
This callout is made 100 feet above the minimum altitude to prepare the pilot to make the decision to land or take off.
Approach techniques and special precautions
- Full Configuration:
When transitioning to the landing configuration, accelerate slightly to ensure flight stability. - VOR approaches and minimum altitudes:
For approaches that are not ILS or LPV, 50 feet must be added to the decision height (DH). This is necessary because it is not permitted by law to fall below the minimum height. This additional height is necessary to compensate for any descent during a take-off. - Attention at the backcourse:
If the localiser is set to a runway such as 24 and you take off with the HSI, the instrument displays correctly. In this case, the HSI interprets the take-off as a command instrument (fly left with left-hand take-off). Problems occur if the localiser is set to an opposite runway (e.g. 06) - in this case, the display is interpreted as a mirror image.
Important advice from the instructor
- Never fly anything that you have not briefed. The following applies in cases of uncertainty: "Go Around!
07.10. - Ninth flight in the simulator with flight instructor 2
General findings on icing and engine performance
- Simulation of icing during take-off:
Flight instructor 2 showed how icing affects engine performance. The result: the engine power does not build up, the RPM stops at 2100 and does not increase any further.- Indicators: Oil pressure remains normal, which rules out a problem with the governor.
- Typical scenario: If oil pressure is lost, the governor would automatically go to the lowest pitch (as with the lever fully advanced).
- Conclusion: The weather conditions (ATIS: dew point 4 °C, temperature 6 °C, cloud base at 1000 ft) were typical for icing. When climbing to 5000 ft, -4 °C and icing were to be expected.
Go Around procedure
- The sequence is analogue to the approach, but in reverse order:
Flaps up → Gears up → Flaps up.
Important corrections for the NDB approach
- Performance and configuration management:
- Before the FAF (Final Approach Fix): Set power to 17-18 inches, stabilise speed at 120 knots, then Set flaps 10.
- Shortly before the FAFReduce power to 14-15 inches, at 100 knots Gears down set. This creates the necessary resistance to control the sink rate.
- Important: Speed is controlled with pitch. Trim adjustment upwards is crucial to maintain 100 knots.
- Full Configuration:
When setting the full landing configuration (flaps, gear), the speed is further reduced. Power must therefore be added to enable a lower descent rate. The nose must be set to approx. 5 degree pitch be trimmed in order to 85 Knots stable.
Standard callouts
- "Approaching Minimum"This callout takes place 100 feet before the minimum heightto inform the pilot in good time.
Briefing and checklists
- Briefing and follow-ups:
- After each take-off: Carry out follow-ups.
- During the descent before the IAF (Initial Approach Fix): Tick off all the necessary points from the briefing and the approach checklist.
- Important: All preparatory steps must be completed before reaching the IAF.
18 Oct - Tenth flight in the simulator with flight instructor 2
Safety during RNAV departures
- With a RNAV Departure flight instructor 2 demonstrated how important it is to also set up traditional navigation as a safety measure. This serves as a backup in case the RNAV system fails.
- In the simulator, a Conventional HSI (Horizontal Situation Indicator) is used. This means that for each waypoint in the loaded RNAV departure, the OBS (Omni-Bearing Selector) manually to the DTK (direct target price) had to be discontinued.
- Comparison with the real machineModern aircraft have an electronic HSI that automatically adjusts to the next waypoint.
Simulation of a GPS failure
- After departure, a GPS failure simulated:
- First measure: Continue to fly the aircraft in a clean and stable manner in order to maintain control.
- Then via radio: "Unable to use GPS due to technical problems. Request radar vectors to [next VOR or destination]".
- Alternatively, it can also be said: "We need a few minutes to go through checklists." This buys time to clarify the situation and start alternative procedures.
Important notes on identification
- When pressing the DME button it is essential to ensure that the display identifies the correct DME.
- Example: If the NAV1-channel is set, the DME of the transmitter set to NAV1 is identified.
Briefing of the approach procedure
- The runway lighting system should also be briefed on every approach. Example of the briefing:
- "Approach lighting system is ALSF 2 with REIL and PAPI on the left side."
- ALSF 2Precision approach light system with several rows of lights.
- REILRunway End Identifier Lights, which mark the ends of the runway.
- PAPIPrecision Approach Path Indicator, a system for displaying the ideal glide path.
- "Approach lighting system is ALSF 2 with REIL and PAPI on the left side."
Procedure in case of missing landing clearance
- If at 2 miles before the runway landing clearance has not yet been given by the tower:
- Send radio enquiry: "Approaching 2 miles, request landing clearance."
- If there is still no reply: Take off (Go Around).
Difference between DME and GPS distance
- Important: In the case of a GPS approach, the distance not from DME but only from the GPS display. The DME may display an incorrect distance as it refers to a point other than the GPS data.
19 Oct - Eleventh flight in the simulator with flight instructor 2
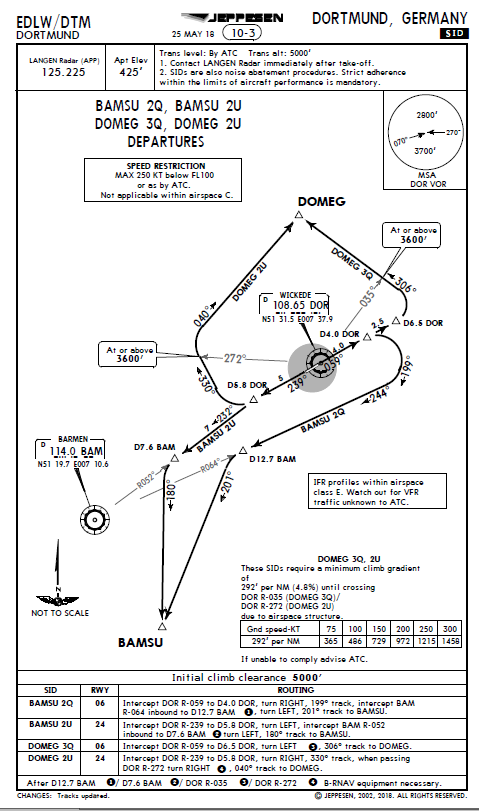
Departure: Dortmund 24 via Domeg 2U
- During take-off, it was crucial to TRACK (not heading) of 330° exactly. As soon as this course was reached, the flight continued to DOMEG with GPS navigation.
- Tip: Set "Direct To" directly and adjust the desired angle in the GPS menu (here to 040°). The GPS then creates an "Infinity Line" to DOMEG.
- Garmin must then be switched to GPS in order to use the new line.
Different routes for Departure and Arrival
- If there are no different routes for aircraft categories A-D in Departure or Arrival, the curves are usually designed for category D.
- Example (DOMEG2U Dep): If you were to click directly on Screw in 040°you would fly parallel and slightly south. Therefore better: Hold course 010 and wait until the HSI adjusted radial 040° run-in.
Holding company
- At the Inbound it is important to determine the exact time:
- The inbound begins not after one minutebut exactly when you are above the VOR. This can be recognised by the fact that the HSI of TO to FROM jumps.
- After flying over the VOR, a right turn is made until you reach exactly on the radial is.
- Outbound minute: This starts as soon as you select exactly abeam (e.g. if the RMI points exactly 90° to the right or the HSI of FROM to TO changes).
- The return flight to the inbound radial takes place precisely after one minute with a corresponding right turn so that you are exactly on the radial again.
- I came from 150 degrees and 059 was inbound track i.e. quasi right-angled. Hence special direct entry (but you can also fly direct entry in this case)
Approach
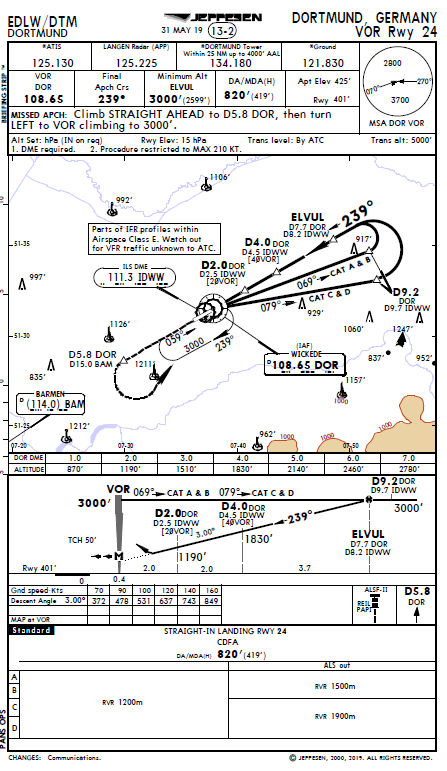
- After the holding, the aircraft was on 5000 ft. The altitude profile allowed the aircraft to descend from the VOR after the Cleared for Approach-release was available.
- Sink planning:
- Altitude to sink: 2000 ft.
- Descent rate: 500 ft/min → Duration: 4 minutes.
- Speed: 120 knots → Distance: 2 miles/minute → Distance: 9.2 miles, i.e. sufficient.
- Sink planning:
- Briefing of the approach:
- "At 9.2 DME, I turn left heading 270 to intercept final approach track 239."
- Expected lighting system: "ALFS II lighting system with REIL and PAPI on the left side."
- Special features of the runway (e.g. icing) and planned taxi routes on the runway must also be briefed.
- Check AltitudesThese specified heights must not be undercut under any circumstances. If in doubt, height must be maintained.
- Final Approach:
- The complete Checklist must be received by 1000 ft AGL ideally already at 1830 ft check altitude (1400 ft above ground).
- When the runway is in sight "Runway in sight. Continue visually", the flight continues by sight, while after the PAPI system is navigated.
- Precision in line management:
- Example: If the VOR is slightly to the right of the runway, the line must also be slightly to the right in order to land exactly in the centre of the runway