I hope the diary is useful and interesting for pilots who are also thinking about doing IR training. It is important to note that the diary is of course neither "complete" nor in any way "correct". I simply noted down what we did in each lesson and what I took away as key learnings.
It is important to note that I only ever flew Cessna 172s before my training. During my training I flew a TB20 with a variable pitch propeller and retractable undercarriage and TKS deicing. So it wasn't just instrument flying that was new to me, but also the handling of a complex machine. That's exactly what I wanted! That's why the diary also contains some very aircraft-specific tips (first in the simulator and then in the TB20). I have now added a few hints which I have always marked with "Note".
Have fun!
16.09 - First flight in the simulator with flight instructor 1
General information
Today was my first day in the simulator, accompanied by flight instructor 1. I received some basic instructions that proved to be extremely helpful:
- It makes sense to concentrate on one or two flight instructors to ensure continuous support and smooth scheduling with the instructors and the operations department.
- For the training, you can either use Jeppesen cards on the iPad or print them out and take them with you. However, printed cards are mandatory for the exam (note: this may no longer be necessary these days)
- Instructor 1 recommended an annual subscription to Jeppesen digital maps, which costs around 100 euros.
- During my training, I will need tickets for airports such as Dortmund, Münster, Cologne, Paderborn and Niederrhein.
Theoretical foundations: Control and Performance
The day began with a talk about the concept of "Control and Performance". Instructor 1 explained how different control inputs affect the performance of the aircraft. The main control elements are:
- Pitch/elevator,
- Power (RPM and MP),
- Aileron/bench,
- Rudder/Yaw,
- Flaps/gear
- (airbrakes, slats)
The effects of these inputs can affect the speed, the rate of climb or descent and the rate of rotation.
Instrument scanning
Another topic was instrument scanning, in particular how to read the instruments in a sensible sequence. The focus is on the so-called "T-scan". You always start with the artificial horizon, scan another instrument and then return to the horizon. Then the next instrument.
- Speed Indicator - Horizon - Altimeter,
- Turn and Bank Indicator - Directional Gyro - Vertical Speed Indicator.
Important: The Turn and Bank Indicator does not show the size of the bank angle, but only whether you are flying in a standard curve. To calculate the bank angle for a standard curve, the following formula applies: TAS/100 + 7 (e.g. at 120 knots this results in a bank angle of 19 degrees).
Handling the controllable pitch propeller
Flight instructor 1 explained how to use the controllable pitch propeller. The following applies:
- When increasing the power, you first set the engine speed and then the manifold pressure (MP).
- When reducing the power, the process is carried out in reverse order: first reduce the MP, then the speed.
To better understand this, he compared the process to a pot of boiling water: the pot symbolises the speed, the water the MP. If you want more power, you first increase the size of the pot (increase the speed) and then add more water (increase the MP). If you want less power, first reduce the temperature (the MP) and then reduce the size of the pot (the speed).
I simply memorise: If I reduce power (i.e. after the climb when transitioning to cruising flight) then I go - from the levers - from left to right: First MP (black), then RPM (blue) and then I reduce the mixture (red). If I increase the power (e.g. if I want to climb higher) then I go from right to left.
When cruising, leave the governor as set. If you want to make slight changes to the speed there, you can only do this with MP.
Climb rate and speeds
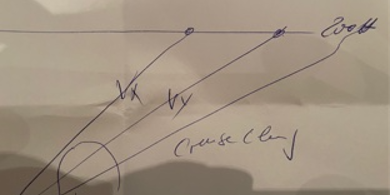
We discussed the different speeds during the climb:
- VX (best climbing angle)Ideal when obstacles need to be overcome, but takes the longest.
- VY (best rate of climb): Reaches the greatest height in the shortest time.
- Cruise ClimbAn efficient climb technique with higher speed, which consumes less fuel and offers better visibility due to the lower angle of attack.
Practical part: Flight in the simulator
We then went into the simulator. The most important findings from this part:
- Before take-off, the trim should be set to "5" (note: this was of course specific to the simulator).
- During start-up, the speed is only regulated with the MP, the governor (blue) remains at full power.
- After take-off, the following announcement is made: "Positive Climb. Brakes. Gears up."
- At an altitude of 500 feet above ground level, a climb rate of "25/25" is set (MP = 25 inches, RPM = 2500).
- For cruising, the power is set to 21 MP (actually 22, the value automatically increases to 22 after a few seconds) and 2300 RPM is reduced.
- When switching the tank, the fuel pump is always activated first.
- You should always listen to the emergency frequency 121.5 on COM2.
Another important point (note: again aircraft-specific, of course): During take-off, take off with 10 degrees of flaps, which are then retracted at 500 feet above ground. The speed should always be checked before extending the flaps ("speed check").
This was my first day in the simulator - an exciting introduction to the world of instrument flying!
17.09. - Second flight in the simulator with flight instructor 2
Cockpit management
Today, the focus was primarily on the detailed operation and handling of the instruments in the cockpit. Flight instructor 2 placed particular emphasis on giving some important tips on navigation and interpreting the displays. Here are the things that were particularly important to him:
- HSI (Horizontal Situation Indicator) and RMI (Radio Magnetic Indicator) discussed again....
- VOR identificationIt is sufficient if the Garmin displays the identification of the VOR (and thus makes the identification in the background) - listening to the Morse signal to check whether the correct VOR is being received correctly is no longer necessary in this case. For the DME However, this does not apply to the DME, as the frequency is only linked to the VOR and the Garmin cannot identify the DME code. The DME must therefore always be listened to.
- The instrument assignment is as follows (note: naturally specific to the simulator):
- Nav 1 is on the HSI and Nav 2 on the smaller instrument to the right of it (and the RMI from the ADF on the left). The RMI also has a VOR display. This can be switched between nav1 and nav2 using a switch);
- on the stand-by instruments in front of the right-hand seat it is the other way round
A favourite trick of examiners was also discussed: The ADF button switch off. If the ADF does not receive anything, the needle will automatically show 90 degrees (as if it is "locked"). You must therefore ensure that the ADF button is activated in order to obtain reliable displays.
Landing with VOR and ADF
A recommendation from instructor 2: When approaching, you should set one of the VORs (e.g. the combined ADF display VOR) to the landing site VOR. This always shows the direction to the airport and has the advantage that you can prepare for the final approach at an early stage. As the VOR has a 10 degree angle of bank (compared to 2.5 degrees for the ILS), the VOR comes in earlier than the ILS and you know when to turn in.
Flight conditions and emergency procedures
Instructor 2 went into detail about the correct reaction in various flight conditions and emergency situations:
Emergency situation during take-off, climb and cruise flight discussed.
Levelling:
- When climbing out of cruising flight, the nose should be raised first and only then should the power be increased.
- To level off for cruise, divide the rate of climb by 10 to determine when to stop climbing (e.g. at 1000 ft/min rate of climb: start lowering the nose 100 feet before).
Slow flight:
- In slow flight, the pitch must be pulled upwards to maintain altitude as the lift decreases. The artificial horizon should serve as an orientation - remember: The Attitude Indicator does not show whether I am climbing or descending, but rather my position in relation to the horizon; when travelling, the nose must be exactly on the horizon to fly straight ahead, but not, for example, in slow flight.
The second day also passed with many valuable lessons and practical exercises in the simulator.
23 September - Third flight in the simulator with flight instructor 2
Cockpit management and system knowledge
Instructor 2 placed particular emphasis today on understanding the systems in the cockpit. We began by discussing the alternative systems that can be used in an emergency:
- Alternate Static Air:
This switch is located in the simulator at the bottom of the right-hand door. If the static pipe becomes blocked (e.g. speed decreases at altitude although I do not change anything), the static air is drawn from the cockpit. However, this always has a slight negative pressure. - Alternate air for the engine:
The lever is located under the gear lever and is pulled when the air intake for the petrol/air mixture is iced up. This is basically like a carburettor preheater that draws warm, unfiltered air into the engine.
Some aeroplanes do not have a manual lever for this. Instead, a spring automatically opens a flap in the event of icing. Important: With ICING conditions this lever must always be pulled! - Petrol pump in low-wing aircraft:
The electric fuel pump must be switched on during take-off and landing as well as during the climb. Reason: Although the mechanical, engine-driven fuel pump is driven by the crankshaft, it could fail in an emergency. The electric pump is switched on as a safety measure.
High-deckers have exactly the same mechanical motor-driven pump. Here, however, the alternative pump is simply gravity (which is why I am not allowed to use it for inverted flight, for example) - Pito heating:
We activate the Pito heater as standard for IFR flights before take-off. Flight instructor 2 also pointed out that you should also fly longer through summer rain showers to drain afterwards and check whether the fuel caps are tight. Because if they are not, this can be dangerous in ICING.
Flight exercises: Climb, stall and UPRT
Today the focus was on flight manoeuvres, including climbs, stall exercises and unusual flight conditions (UPRT).
Climb:
- The ideal pitch for climbing is 10 degrees for our aeroplane model.
- The power settings are 25″/2500 RPM. It is important to note that you have to increase the thrust with increasing altitude in order to maintain the boost pressure. We climbed at around 95 knots.
- After levelling out, the boost pressure is set to 21″ is set. The RPM is then set to 2300, which automatically increases the pressure to 22″.
Stable exercises:
- Here the nose is lowered slightly below or onto the horizon.
- The order in which the stall is removed is crucial:
- Set flaps to 10 degrees,
- Retract undercarriage,
- Fully retract flaps.
Even if no flaps or landing gear are extended, you should still go through the procedure verbally as a check.
- In IMC I don't switch on the landing lights because they dazzle in the clouds
- Steep turn: When I've reached 30 degrees of bank, I push very lightly
UPRT (Unusual Attitude Recovery Training):
- Always look at speed and whether nose up or down
- For example, if I have a massive nose up on the left and lose a lot of speed: give thrust, but NO BANK because I have little lift at that moment anyway and would then have even less; nose down hard but on the horizon and not below it. So:
- PitchPush the nose down to reduce the angle of attack and cancel the stall. This is the most important step in regaining control of the aircraft.
- Power: Increase power (thrust) to increase lift and speed.
- BankRe-align the aircraft if an unwanted pitch or roll movement has occurred.
- For example, if I have a massive nose down on the bottom left and therefore a lot of speed, then: take out the thrust and at the same time pull the bank and pull hard to get to the horizon...when speed is built up, then take out speed again. ALSO
- Power - Power out to reduce speed
- Bench - Then straighten the wings
- Pitch - Then raise the nose to the horizon
- For example, if I have a massive nose up on the left and lose a lot of speed: give thrust, but NO BANK because I have little lift at that moment anyway and would then have even less; nose down hard but on the horizon and not below it. So:
Turns and navigation
Another highlight of today's flight was practising time-turns and course corrections without gyroscopes.
Time Turns:
- The aim was to fly a standard circle in exactly 2 minutes.
The bench angle is calculated using the formula: TAS ÷ 10 + 7.
Example: With a TAS of 130, this results in a bench angle of 20 degrees. - Progress is checked during the bend (stopwatch running): You should complete 45 degrees every 15 seconds. If you are too fast or too slow, the bench angle is adjusted slightly.
- All based on the Turn and Bank Coordinator
- We then did the whole thing as a climb, i.e. I want to climb at exactly 500ft/min and I check that by looking at the altimeter and that all 125 feet of altitude (as with the clock, this is always a quarter) have been reached after 15 seconds
Navigation without gyro (Compass Turns if gyro has failed, for example):
- If the course is southerly, overtorque and at 30 degrees more, eject. (south = overturning)
- If the course is northerly, it is led out 30 degrees earlier (nOrd = vOrher).
- There is no correction for east and west courses, as the deviation is zero and then, for example, SE 10 degrees, SSE 20 degrees and S 30 degrees.
Course Interception (NDB and VOR):
- At the NDB Intercept the RMI used. The arrow shows the QDM (heading to station) and the end of the arrow shows the QDR (radial). This is of course only the case if you have avionics where the RMI rotates with the heading gyro. An example: If the arrow points to 360, you are on radial 180, but if you want to fly on radial 170 (i.e. heading 350), then think about it:
- Assuming I am flying on the radial 180: Radial is to the right of me then I fly e.g. 10+30+ 350=390 i.e. course 030 to the right and then wait until the ADF arrow enters the course 350 because then I am exactly on the radial and then I steer to course 350 and am exactly on it.
- The following always applies: if the ADF needle indicates a course that is too large (in my case 360 instead of the desired 350) then steer larger. If it is smaller then steer smaller.
- At the VOR-Intercept the HSI helps: The arrow always shows the direction to the station. So if the arrow is pointing upwards, I am in "To", otherwise in "From"
24.09. - Fourth flight in the simulator with flight instructor 3
Flight exercises: Stall and UPRT
Instructor 3 today concentrated heavily on the basics of aircraft handling, especially behaviour in stalls and unusual flight conditions.
Trimming and maintaining speed:
- An important realisation: if the aircraft is properly trimmed, the speed only needs to be maintained with the thrust. This keeps the aircraft stable and requires hardly any further input.
Stable exercises:
- When the nose is up (loss of speed):
- First press your nose gently onto the horizon.
- Then increase the thrust to regain speed.
- The bank is only adjusted in the final step, if necessary.
- With flaps extended (often during take-off or landing):
- First press on the horizon or slightly below it.
- Increase thrust and at the same time immediately set the flaps to 10 degrees.
- Wait until the "positive rate of climb" is reached and only then retract the landing gear.
The reason: In the event of such a stall - which typically occurs during take-off or landing - the landing gear initially remains outside in order to absorb any impacts and protect the propeller.
- When the nose is down (excess speed):
- In this case, there is already enough speed. Therefore, first speed out, then bank correction, followed by a clean pull of the nose to the horizon.
Time Turns
Another exercise was the precise execution of time turns. Flight instructor 3 emphasised that the stopwatch should only ever be pressed when the aircraft is already in the desired bank position. This improves accuracy and ensures clean turning manoeuvres.
Training Exercise: X-Check Scanning Techniques
We worked intensively with an exercise sheet that contained various training units for scanning the instruments correctly. The aim was to let our eyes wander systematically over the most important displays without losing focus. We then flew various exercises on turns, where we had to climb or descend during the turn. All without looking outwards.
Landing approach
Instructor 3 explained today the standard procedures for the landing approach during CB-IR training, especially for long runways:
- Procedure for landing with 10 degree flaps:
The standard training is to land with 10 degree flaps on long runways. If the runway is shorter, the flaps can be fully deployed in a stabilised landing configuration (typically 1000 ft above ground). - Note: Other instructors have seen this differently and we have always set full flaps at 1000ft as standard. In any case, you should be stabilised from 1000 ft or the "check altitude" and not change anything in the configuration.
- Sequence of flap and landing gear setting:
- As soon as the glidepath shows a deviation of "Half Deflection" (one stroke deviation), 10 degree flaps are set.
- When the "full deflection" is reached, i.e. when you are on the glidepath (or slightly before if the glidepath is in the upper area of the diamond), the landing gear is extended to initiate the descent.
- Speeds and control:
- A speed of 90 knots is maintained for landing with 10 degree flaps.
- Important: The speed is regulated via the pitch (nose position), whereas the height is regulated with the throttle.
- The flight attitude is maintained in the upper third of the pitch ball, while the rate of descent is primarily controlled by the speed.
General information and outlook
Flight instructor 3 gave me a few valuable tips along the way:
- I should definitely print out the approach charts for Dortmund, Münster and Düsseldorf and have them to hand.
- I should repeat the "Training Exercise for X-Check Scanning Techniques" on my own in the next few days.
Next topic: Course Reversal Procedures
We also got a preview of the next topic: The introduction to "Course Reversal Procedures". There are two options:
- Option 1: Introductory course at 45 degrees for 45 seconds, followed by a 180-degree turn back to the target course (intercept).
- Option 2: Introductory course at 80 degrees, followed by a 260-degree turn in the opposite direction.
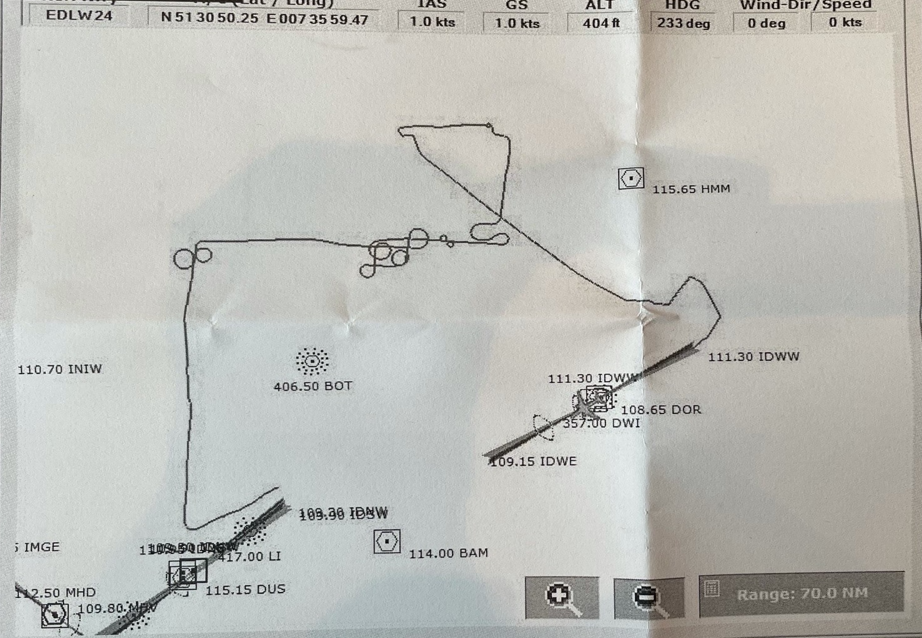
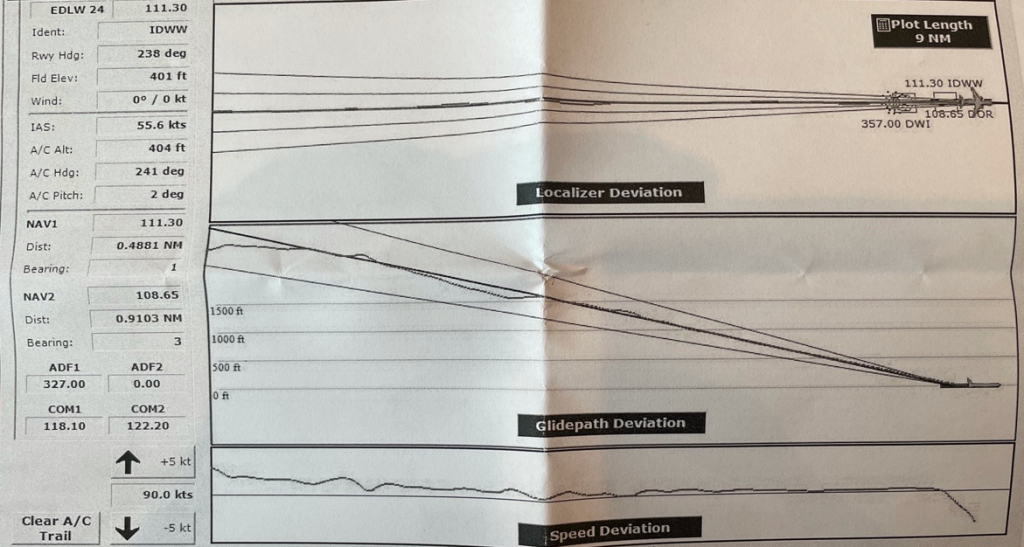
Here are my results. The printouts show the entire flight path we flew (with all the turns:-)) and then how well I was able to keep the localiser and glidepath around the permitted area during the landing approach (looks ok, but to be honest we practised this several times).